Graphic Tools
Here is an overview of Adesign main toolbar with all menus opened at the same time. Click directly on any tool to get a brief tutorial on its usage.


Move Tool

Use it to move different objects of your image (pixels, selection, layers). The default behavior of this tool is context-sensitive: the result of a move depends on where you click if your image has a selection.
There is 3 differents kinds of move. The icon is changed accordingly to indicate which one you are about to use:


- : This moves the current selected layer.
NB: If your image has a selection, not only the position of the current selected layer will be changed, but the position of the selection too.
- :
When your image has a selection and you click inside the selection. This will move the selection contents: the pixels inside the selection will be cut from their original position on the current layer and moved where you want on the current selected layer.
- :
When your image has a selection and you click out of the selection, this changes the position of the selection without moving the selection contents (the pixels inside the marching ants won't be modified, this will only change the position of the marching ants). You can use the CTRL key to force this moving mode.
Selections
The selection tools let you define selected areas of your image to apply effects or filters. There is no restriction on selections (they can have the shapes you want, you can have multiple selected areas not connected,...). So you have many different ways to define a selection depending on what you are planning to do. By the order of appearance:
- Lasso tool: used to define a freehand selection.
- Polygonal Lasso tool: used to define a polygonal selection. Click on the first point to close the selection.
- Rectangular selection tool: used to define a rectangular selection, or a square selection (press SHIFT to constraint to a square)
- Elliptic selection tool: used to define an elliptic or a round selection (press SHIFT to constraint to a circle)
- The Magic wand tool: when you want to select an area of the image which is nearly the same color. You can specify a tolerance value: if the tolerance value is high, more pixels will be accepted and the selection will be larger.
- Vertical and Horizontal Tile tools: very useful when you want to select a part of an image in order to crop (for example). In this case, these tools are quicker to use than the rectangular selection tool.
 More on selections
Adding and substracting: With every selection tools, you can use CTRL to add to the current selection, or ALT to substract from selection. This is very useful when you want to make a complex selection.
Antialiasing: With every selection tools, you enable/disable the antialiasing option. This option is designed to create good-looking selections. Consider using it especially with elliptic selection. This will greatly enhance your shapes. Be careful when creating very small selections (e.g. when you try to select a few pixels with a zoom of 2000%), the antialiasing feature is not well suited for very small selections and can confuse you. So it is recommended to turn it off to do very small selections.
Defining selections with bezier curves You can also define a selection using bezier curves. To do this, use the vectorial tools and once you have defined a path, click on "convert to selection", this will convert your path to an antialiased selection. See more details about the vector tools.
Saving selections Always think you can save selections by using "Select" | "Save Selection". Then you will be able to load previous selections, and have access to merging options (such as intersection). See more details about saving selections.
Paint Tools: Paintbrush, Airbrush, Pen, Eraser, History Brush.
Paintbrush
This is the general tool used to draw, with the following options:
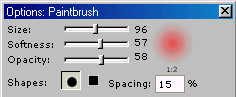 Size: controls the diameter of the brush.
Softness: controls the amount of blur you want. If the softness value if low, the result will be sharpened whereas if you set a higher value it will be smoother.
Opacity: controls the level of influence of the brush on the already existing pixels you are drawing on. An opacity of 100% is opaque (the pixels below will be set to full foreground color) and an opacity of 0% is fully transparent (the pixels below won't be modified at all). You can control the opacity value between these two extrems.
Shapes: You can select a round brush or a square brush.
Spacing: This value specify the space between two dabs. The value is in percentage of the paintbrush size.
Size: controls the diameter of the brush.
Softness: controls the amount of blur you want. If the softness value if low, the result will be sharpened whereas if you set a higher value it will be smoother.
Opacity: controls the level of influence of the brush on the already existing pixels you are drawing on. An opacity of 100% is opaque (the pixels below will be set to full foreground color) and an opacity of 0% is fully transparent (the pixels below won't be modified at all). You can control the opacity value between these two extrems.
Shapes: You can select a round brush or a square brush.
Spacing: This value specify the space between two dabs. The value is in percentage of the paintbrush size.
Airbrush This is nearly the same tool as the paintbrush. There is only one difference : when you maintain the mouse button down, the airbrush continue to paint (you will see the opacity change). The airbrush will continue painting until you release the mouse button (whereas the paintbrush only dabs one time, even if you maintain the mouse button down for a long time).
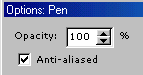
Pen Use it to draw thin lines (antialiased or not). This tool is also very useful when you want to modify only a few pixels (use it in cunjunction with the zoom tool). You can set the opacity of the line you are about to draw or the pixels you are about to modify:
Eraser Use the eraser when you want to replace the pixels by the background color. This is the opposite tool of the paintbrush, with same options.
History Brush Understanding how works this tool is easy and can let you make awesome effects. See this tool as a undo/redo paintbrush: instead of undoing/redoing the steps you have gone through (see the undo/redo feature) this tool allows you to paint back from a previous step of your work! This way, you can easily make a combination of a current aree and the corresponding area in a previous step in the history of your image (with all the options of the paintbrush : size, opacity, softness ...). So, you set the step you want to repaint from, and you are able to modify the pixels of your current image based on a copy of a previous step in your image:
Retouch Tools
Clone Tool
This tool is a paintbrush that lets you copy from a source image.
First, select a source point on an image: ALT+click. This will be the origin of the copy.
Then, you can use it like a paintbrush on the same image or on another image, with all the options of the paintbrush.


Lighten/Darken Tool Use it like a paintbrush to ligthen or darken an area of an image. In the options window, you can set the exposition and the type of action to do (lighten or darken).
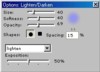
Shortcut: Use left click to use the action defined in the options window, and right-click to use the other. (Example: if lighten is selected then left click to lighten and right-click to darken)
Deform Tools

The deform tools perform 2D and 3D deformations: grow, shrink, smudge and twirls.
Growing tool Grows the area under the mouse cursor.
Shrinking tool Reverse operation: shrink (reduce) the area under the mouse cursor.
Moving tool (Smudge) Move the pixels to expand an area along the mouse cursor.
Twirl tool (CCW = Counter-ClockWise) Makes the pixels under the mouse cursor rotate counter-clockwise.
Twirl tool (CW = ClockWise) Makes the pixels under the mouse cursor rotate clockwise.
The radius and the amount of the effect you want to use is adjustable with the options window.
Drawing Tools
The drawing tools provide access to the following antialiased drawing primitives:
- Lines
- Arrows (with customizable arrowheads)
- Rectangles (and squares)
- Ellipses (and circles)
From the options window, you can set the opacity of the primitive to draw. In addition, some specific attributes are available: width and antialiasing for lines and arrows; the border size for rectangles and squares (if not filled).
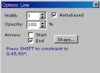
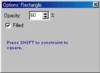
Key feature: maintain SHIFT to constraint:
- the drawing of a line or an arrow to the angles of 0°, 45°, 90°.
- an ellipse to a circle
- a rectangle to a square
Text Tools
The text tool is useful to add smoothed text to your graphics. Two tools are available:
- Text: put the text in a new layer.
- Text selection: create the text in a selection.
In both cases you can set the font, the size, the orientation and the attributes of the text. With the first tool, you can also set the opacity of the text. In both cases, when defining your text, you can move the text to the position you want on your image (without closing the window).
Transform Tools
Each of these tools provide access to a specific transformation. By the order of appearance:
- scale
- rotate
- skew
- perspective
- distort
These tools operate on the current selection of the current layer (or on the full layer if there is no selection).
How to use these tools
- First, create a selection you want to transform (or select a layer).
- Then, click on any transformation tool.
You are now in transformation mode. In this mode, you can select another transformation tool or the zoom tool.
If you select another tool, i.e. you want to exit the transformation mode, you will have to choose between:
- applying the transformation you have defined and exit the transformation mode
- exiting the transformation mode without applying the transformation
- returning to the transformation mode.
- Move the handles to get the transformation you want. You can move each handle and the center of rotation.
- When you are finished:
- If you want to apply the transformation: double click on your image (or click on "apply transformation" on the options window). The antialiased transformation corresponding to the transformation you have defined will be computed and applied.
- If you want to cancel the transformation, select another tool and click "no" to exit the transformation mode without applying the transformation.
The options window of the transform tools in transformation mode. Note the "Apply transformation" command (equivalent to a double-click when you are finished). When you are using the scale tool, you can use the SHIFT modifier to maintain aspect ratio when scaling.
A very simple example detailed step by step:
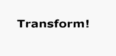
1. A new image is created, and a text layer is put on it using the text tool.
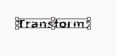
2. A transformation tool is clicked. The selection appear with a bounding box that let you define the transformation by moving the handles.
3. The transformation is being defined (another transformation tool can be selected at anytime to compose transformations)
4. Once finished, the transformation is applied with a double-click.
Vector Tools
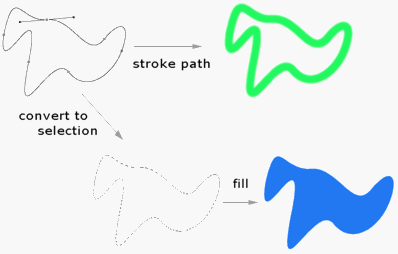
The vector tools let you define bezier curves. These tools are useful to create very good looking shapes. In the following, such shapes are called "paths". Different tools ara available to design paths, by the order of appearance:
- Define path: Use it to define the vertices of the curve. If you click it will place a vertex, if you mouse down then move the mouse without mousing up, you can define the tangents.
- Add vertex: use it to add a vertex on the path between two vertices
- Delete vertex: use it to remove a vertex from the path.
- Move vertex: use it to move a vertex of the path, the tangents are updated.
- Modify tangents: use it to edit tangents of an existing vertex
- Move path: Use it to move the full path (all the vertices)
Once you have defined a path, you can stroke the path, i.e., automatically apply a paint tool (paintbrush, clone tool, or lighten/darken) along the curve, or convert it to a selection. Note that to be able to convert a path to a selection, the path must be closed, it means the last vertex should be placed on the first, like on the illustration below:
Fill and Gradient Tools
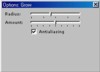
Floodfill tool: Use it to fill an area using the foreground color, based on a given tolerance value. You can set the tolerance value from the options window:
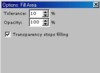
If the tolerance tolerance value is high, more pixels are filled. You can also set the opacity value that will be used for filling. Check the option "transparency stops filling" when you want to fill an area of a layer which is limited by transparency: for example, you have a text layer and you want to fill only one letter of the text: the "transparency stops filling" must be checked. If you want to fill all the letters at one time, you must uncheck "transparency stops filling" so the floodfill tool is not limited by the transparency between the letters of your text.
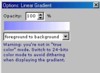
Gradients: 4 different shapes of gradients. You can set the type of gradient (gradient between foreground and background colors, or gradient between foreground color and transparency) and the opacity from the options window. The gradients are the same in 16 bits (65536 colors) and in 24 bits (16M colors) or higher. However, if you are in 16 bits color mode, the display of the gradient will be dithered (stripes can appear, due to the low amount of colors available for the display). In this case, for the gradient to look exactly how it is, switch to 24 bits color mode (or higher). The options of the fill tools should be used in cunjunction with the preserve transparency option of the current layer (see layer attributes).
Color Picker Tool
This tool let you pick a color from an image. In the options window, you can set how you want the color to be picked: it can be the exact pixel color, or an average of the 9 (or 25) neighbour pixels. Tip: Use the left mouse button to change the foreground color and the right mouse button to change the background color.
Zoom Tool
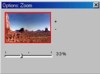
You have 20 levels of zoom, from 2.5% to 2000 %. It means you can see your image between 1/400 its normal size and 20 times its normal size. The options window contains a preview of the zoomed area on your image, you can move the red frame to navigate your zoomed image.
Color Selection
On the main toolbar, you can see:
 This let you choose the current foreground and background colors.
In the above example:
This let you choose the current foreground and background colors.
In the above example:
- Black is the foreground color, that means black will be used as the default color with paint tools.
- White is the background color, that means white will be used when you clear an area by clicking on DEL (for example).
In the following example:
 blue is the foreground color and yellow the background one.
Key features:
If you look at both cases you will see two very small buttons:
blue is the foreground color and yellow the background one.
Key features:
If you look at both cases you will see two very small buttons:
 : click on it to exchange foreground and background colors.
 : click on it to get black as foreground color and white as background color.
You can use the color picker tool to pick a color from an opened image.
You can also click on the displayed foreground or background color, this will show a color dialog to help you choose a new color.
: click on it to get black as foreground color and white as background color.
You can use the color picker tool to pick a color from an opened image.
You can also click on the displayed foreground or background color, this will show a color dialog to help you choose a new color.